WCAG: 1.1.1 Non-text Content


This is the first in a series of blog posts (61 in total!) that will cover the different elements of WCAG compliance. There are tons of official recommendations per the compliance guide here, but for the sake of brevity and efficiency, we’ll be focusing on the most common scenarios and easiest ways to make your sites more accessible with the wealth of tools out there. To understand why we’re doing this, then please check out our Web Accessibility and WCAG 2.0 – In Plain English article.
Fancy Name: WCAG 1.1.1 (A) Text Alternatives – Non-text Content
Use “Alt img” and “Alt text”
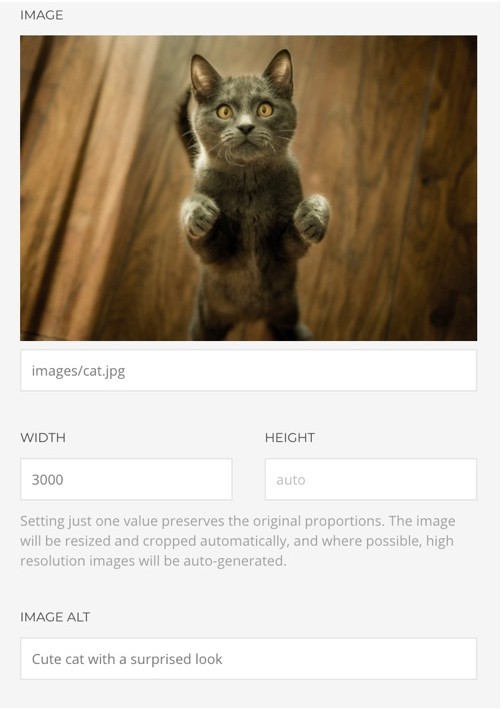
This item is all about describing your media in a way that works audibly and visually. There are a ton of screen readers, that do… well, just that. It’s software that will read the website to the user, and if there aren’t quality descriptions around your media (or in most cases, there aren’t any descriptions at all), then the screen reader won’t be able to do their job. For example, let’s take this picture of this cat that looks both confused and frightened.

The picture of the cat is pretty great, but we need some way to describe this image to screen readers or any machine/ bot scouring the web (so this exercise is also beneficial for SEO). In the page source, it’s listed as this:
“image”:”images\/cat.jpg”,”title”:””
Not very descriptive, eh?

However, with the abundance of web editors out there, it’s really easy to add descriptions to images without meddling in code. In the screenshot above, you’ll see there’s an area to add this type of text. Once we plug that in, you’ll see how that changes the code. In almost every web editor out there for popular CMS systems such as Joomla, Drupal or WordPress – they should have their own way to make this happen.
So now, our code looks like this:
“image”:”images\/cat.jpg”,”image_alt”:”Cute cat with a sur prised look”,”meta”:”Surprised cat”}}]}

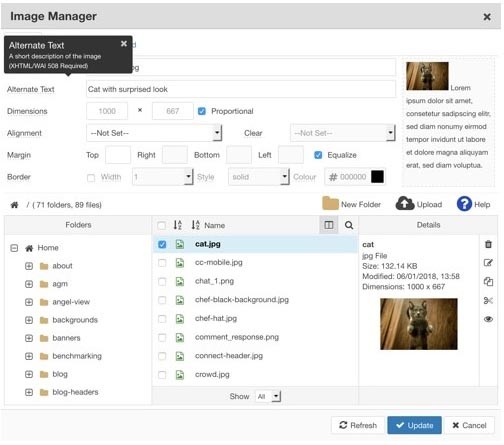
Using an editor called JCE Editor, to the left, is another way to get the same results.
Describe your video using long descriptions
Leading video services such as YouTube or Vimeo will have built-in ways to describe the video (this is different than providing full transcriptions, as described below. However, you may also have the need to describe other direct embeds (such as .MP4 files) on your site. In this case, you can include a ‘longdesc’ HTML tag to help describe what’s happening in the video. For example, on our homepage, there’s our logo spinning to resemble a record player, so we can use the below code:
Describe your controls
If you have forms/ buttons – ensure they’re properly described in your code. For example, if we have a button that takes the user back to home page. It needs to be described. Similar to the above – if you use a common web editor, then it should have options to do this. If not – then I’d suggest looking for a different option.
If the text on the button is straightforward and meaningful, say “Return to Home”, then we don’t need to add it to the title. Otherwise, it’d be redundant (and annoying to the user): [{“name”:””,”type”:”button_item”,”props”:{“button_style”:”default”,”icon_align”:”left”,”content”:”Return to Home”,”link_title”””}}]}]}]}]}
But, if the text on the button needs to more information, then the following implementation would work:
[{“name”:””,”type”:”button_item”,”props”:{“button_style”:”default”,”icon_align”:”left”,”content”:”Back”,”link_title”Returns to homepage””}}]}]}]}]}
You’ll see that it’s described as a button, and you’ll see that the button is meaningful (e.g. “Return to Home” with a link title stating the same. Voila! Mission accomplished!
Describe video, audio or infographic
YouTube has auto-captioning but like any auto-translation service, it can be inaccurate or hinder your content. As part of your video strategy, simply take the time to provide some manual translations of the content. For any video – the hard part is producing the video itself, so take the extra time that’s needed to do this, and do it well.
For audio – if you’re using a savvy enough audio player, they’ll also have captioning tools. If not – then linking the user to a different page with the audio captions is also beneficial.
For infographics – similar to the audio, it’s important to describe the infographic in detail; the details, the stats, and the main takeaways of the graphic itself. Honestly, it’s better just to create the infographic in HTML, therefore the text is separate from the images. You’ll save more time/ money this way, while keeping accessibility at the forefront! Double win!
Other do’s and dont’s
- Don’t keyword stuff stuff your alt text and img alt tags with keywords. Users don’t like it, and Google doesn’t like it. Imagine describing an image to someone in the next room. Use that same approach to your tags.
- If something is decorative (design frills, etc), then no need to describe it. =It’s visually pretty, I’m sure, but it doesn’t explain what you’re offering, and just provides clutter.
- If you’re using CAPTCHA, use the one that has an audio version as well.
- If you’re using an image caption, don’t use alt text. It’s redundant.
Other Insights
Contact Us
Monday Loves You
1770 West Berteau Avenue, #206
Chicago, IL 60613
312.973.1112
hi@mondaylovesyou.com
©Duple Meter LLC 2024
Contact Us.
Monday Loves You
1770 West Berteau Avenue, #206
Chicago, IL 60613
312.973.1112
hi@mondaylovesyou.com


