


To keep your funding active, Google Ad Grants recipients are required to do a bit more management of their AdWords accounts. Our previous article, AdWords Changes to Google for Nonprofits: Overview reviewed the new requirements that were implemented on January 1, 2018. In this article, we review each and explain them in greater detail, providing step-by-step instructions and screenshots for the average user to effectively assess and update your own account.
We’ll also mention, we prefer to work in the AdWords original screens vs. their new Beta version which often is a little buggy (the Beta version has the black nav bar and left side menu).
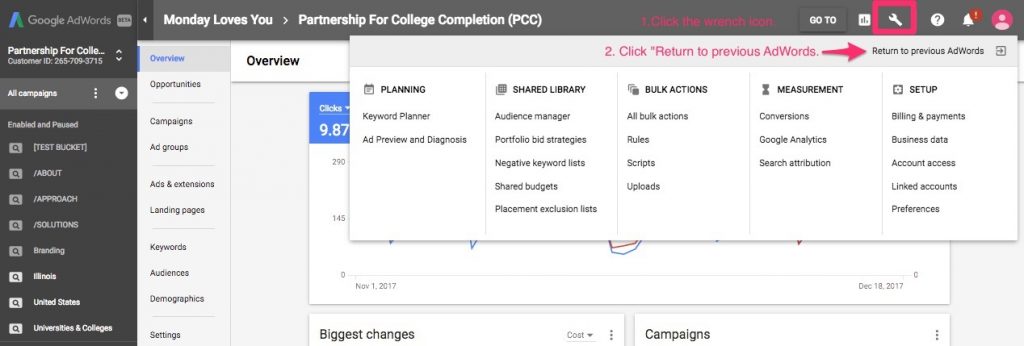
To change from the Beta version to the original screens, click on the “wrench” icon in the upper right corner of your Beta dashboard and click “Return to previous AdWords“.
I. Maintain a 5% minimum average Click Through Rate (CTR).
Google will disable accounts that fall below a 5% CTR for more than two months.
CTR explained
A ratio showing how often people who see your ad end up clicking it, Click Through Rate (CTR) is used to gauge how well your keywords and ads are performing. CTR is the number of clicks that your ad receives divided by the number of times your ad is shown: clicks ÷ impressions = CTR. Each of your ads and keywords have their own CTRs that you can see listed in your account.
If your account falls below a 5% CTR for more than 2 months, it will be disabled. Don’t panic; it’s important to distinguish here that “disabled” is not the same as “deactivated.” When an account is disabled it isn’t running, but the account is still activated – meaning the grant is still in place. However the account owner will need to make the fixes and then telephone Google AdWords Support at (866) 246-6453, to “enable” the account to run again.
If you aren’t already, you’ll want to monitor your account’s CTR average closely and keep it above 5% with audience-focused, mission-focused content.
CTR explained
Follow the steps below to find your CTR percentages and pause campaigns with low scores until you can assess the issue.
1. Access the Campaigns screen by clicking the Campaigns tab. Here you will see a full list of all your campaigns. Look at the bottom of the CTR column and you’ll see the overall average for the account.
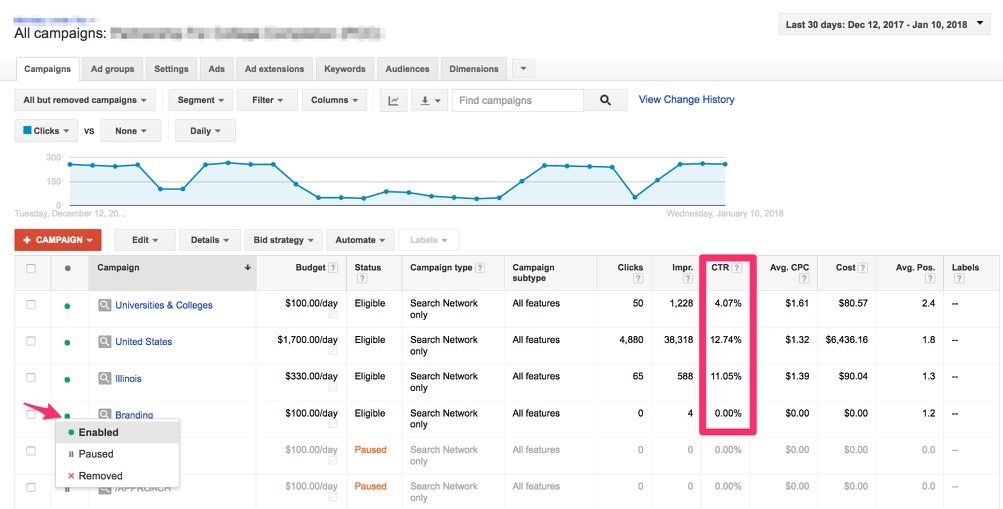
2. Determine which of your campaigns have the lowest CTR averages. On the Campaigns screen, click the CTR Column. This will sort your campaigns by their CTR percentages in ascending or descending order.
3. Investigate which campaigns are performing lower than 5% CTR. After identifying your campaigns with the lowest CTR percentages, dig deeper into each to discover what is bringing that number down by clicking the campaign – we’ll discuss what to look for more in the sections below.
4. To ensure the culprit campaign doesn’t pull down your CTR average, pause the campaign, ad group or ad until you are able to make the necessary fixes.
5. To pause a campaign, or even an ad group or ad, click the arrow next to the green button on the left side. In the drop down menu click PAUSED. That campaign will no longer be a drain on your CTR account average while it is paused.
II. Each campaign must have two ad groups and two active ads in each.
Google’s updated policy mandates campaigns consist of at least two ads groups with two ads running in each.
Ad groups versus ads
An ad group is the level between campaign and ad. It contains one or more ads which target a shared set of keywords. You set a bid, or price, to be used when an ad groups’ keywords trigger an ad to appear.
All campaigns in your nonprofit’s AdWords account must now possess at least two active ad groups, which must contain related keywords in at minimum of two active ads.
Locating your ad groups and ads
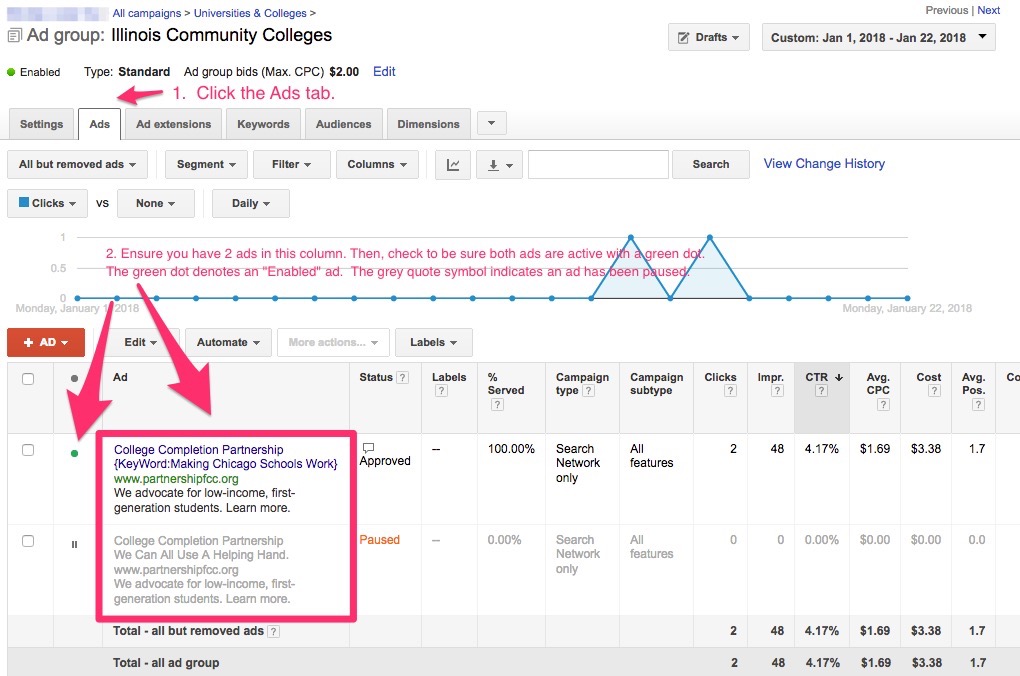
To find if your campaigns have at least two ad groups and two ads, follow the steps below.
1. Access the Campaigns screen by clicking the Campaigns tab. Here you will see a full list of all your campaigns.
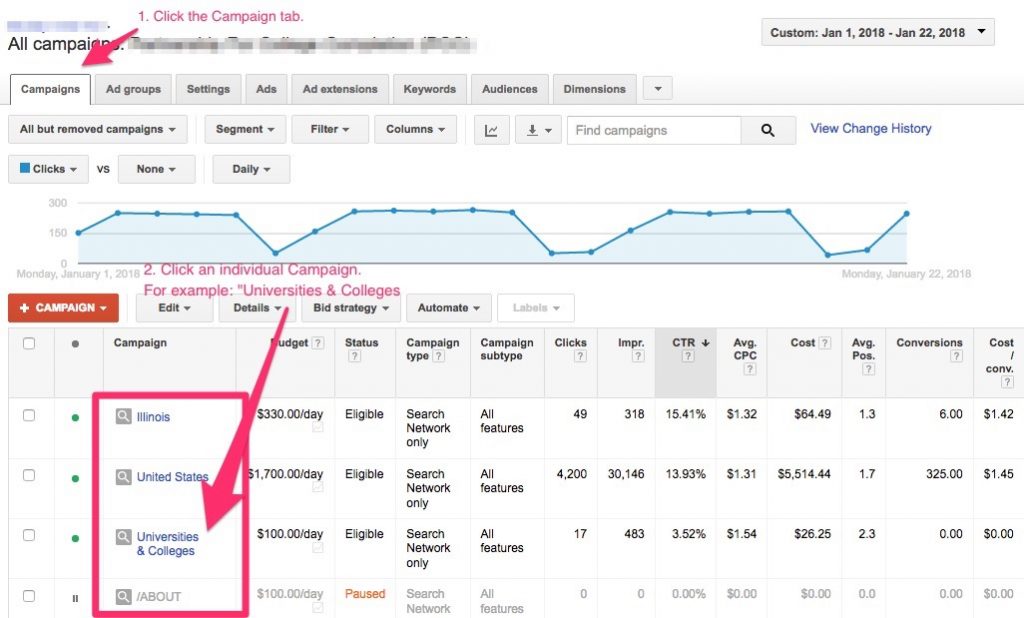
2. Click on each individual campaign and check if you have at least two ad groups inside the campaign.
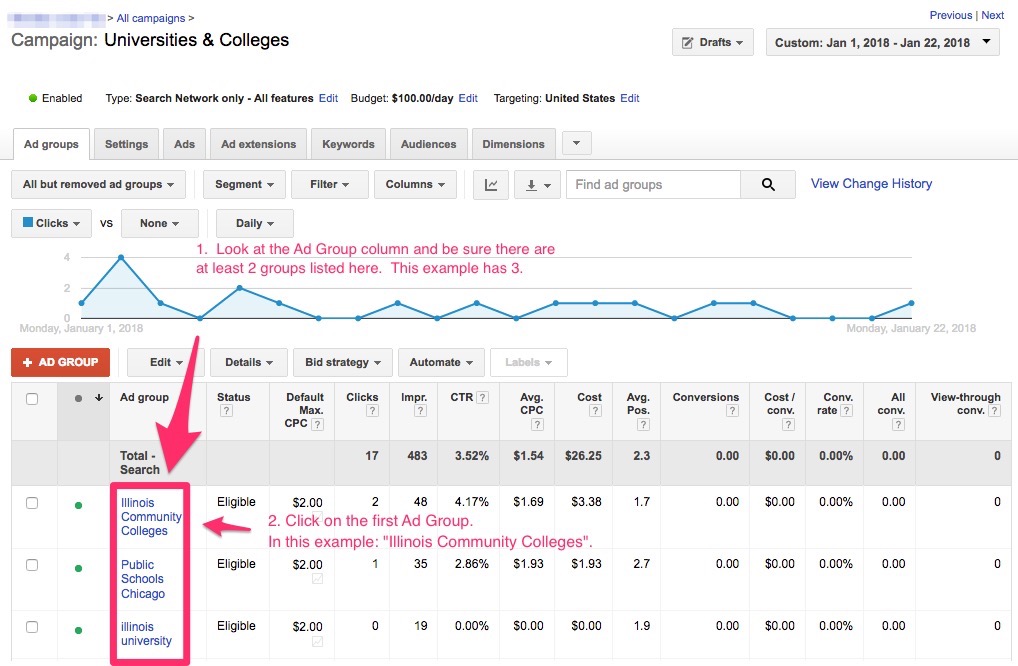
3. Then, click on each individual ad group to ensure you have at least two enabled ads within each ad group. The green button shows if an ad is enabled or active. If you have 2 ads, but only one is enabled, you will need to build or “Enable” another ad.
III. Remove keywords with a quality score below 3.
Keywords with a score of 1 or 2 will no longer be acceptable by AdWords.
Add Quality Score metrics to your screen
In order to see your keyword quality scores, you’ll first need to add the Quality Score column to your stats screen. If you do not see the Quality Score column in your keyword screen follow the steps below. If you do have Quality Score metrics on your keywords screen skip to number 7 below.
1. Begin by selecting the Keywords tab located in the top row of your screen.
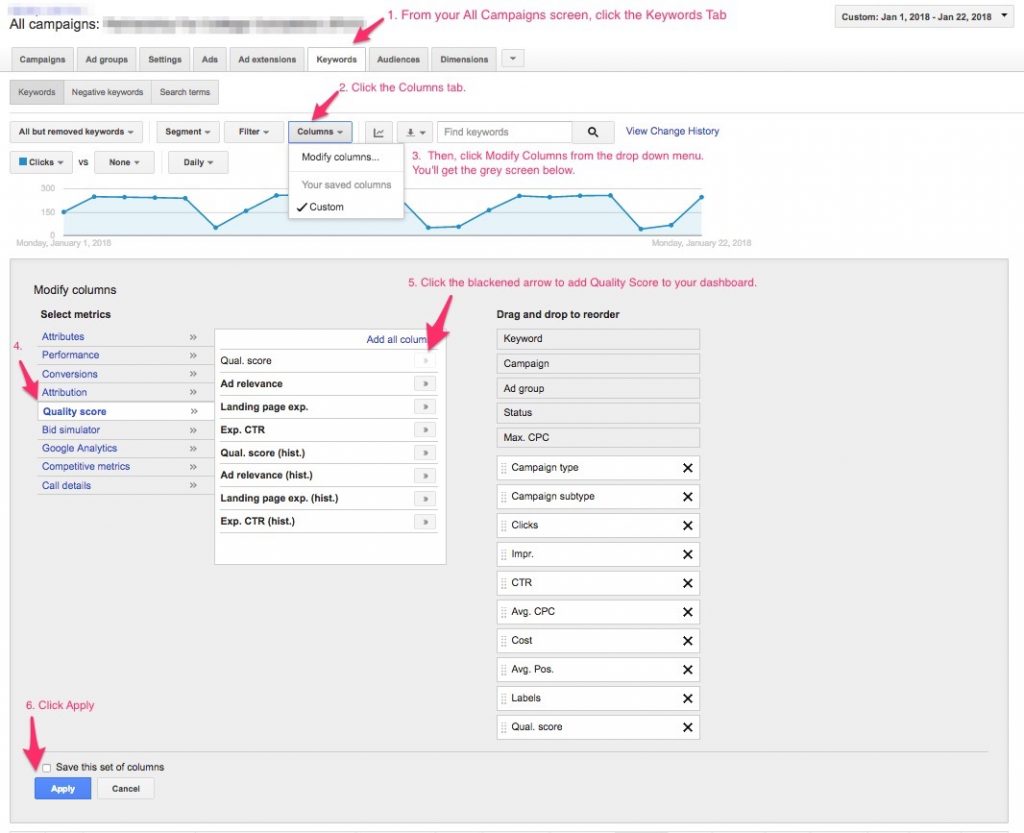
2. Next, click the Columns tab. A drop down menu will appear.
3. From the Columns tab menu, click Modify Columns.
4. On the right hand side of your screen underneath the section titled Select Metrics, click Quality Score.
5. Click the blackened arrows to the right of Qual. Score.
6. Click the Apply button at the bottom to save. Quality score stats will now appear in your dashboard.
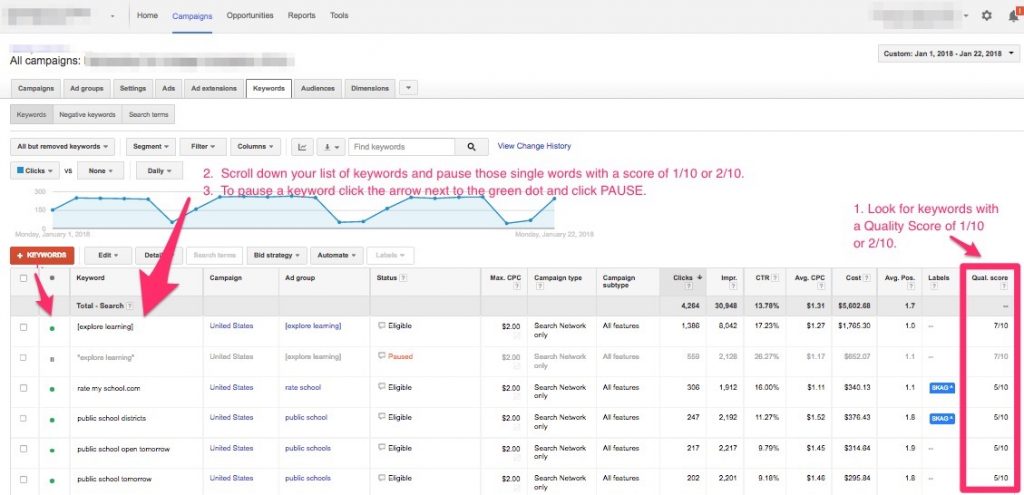
After you have completed the steps above to add the quality score stats to your dashboard, you will need to pause all keywords with a score below 3.
7. Scroll through the Quality Score column as shown in the screenshot above and pause any 1/10 and 2/10 scores. Remember, to pause a keyword click the arrow next to the green dot to the left of the word/phrase and click PAUSE from the drop down menu.
IV. Ensure at least two active site link extensions.
Google’s updated policy mandates all nonprofit grantees have a minimum of two site link extensions active in their account.
What are site link extensions?
Site link extensions are additional URLs that show in ads providing a visitor with other links to learn more information about your organization or ad content. Ad Grants updated program policies require you now keep two of these active in your AdWords account at all the times.
Site link extensions can be implemented at the account level, but it is wise to implement site links at the campaign or ad group levels as well. It gives users options in the hopes that if one link doesn’t hook them, maybe another will.
Where to find site link extensions
To see your active site links, all you need to do is select the Ad Extensions tab located at the top of your AdWords dashboard. Your site link extensions will be listed under that tab. You can also find Ad Extension in your Ad Group screen. You will need to see at least 2 site link extensions to meet the new requirement.
To create a site link extension, first think about what page on your website you want to promote.
1. From the Campaigns tab, click the Ad Extensions tab.
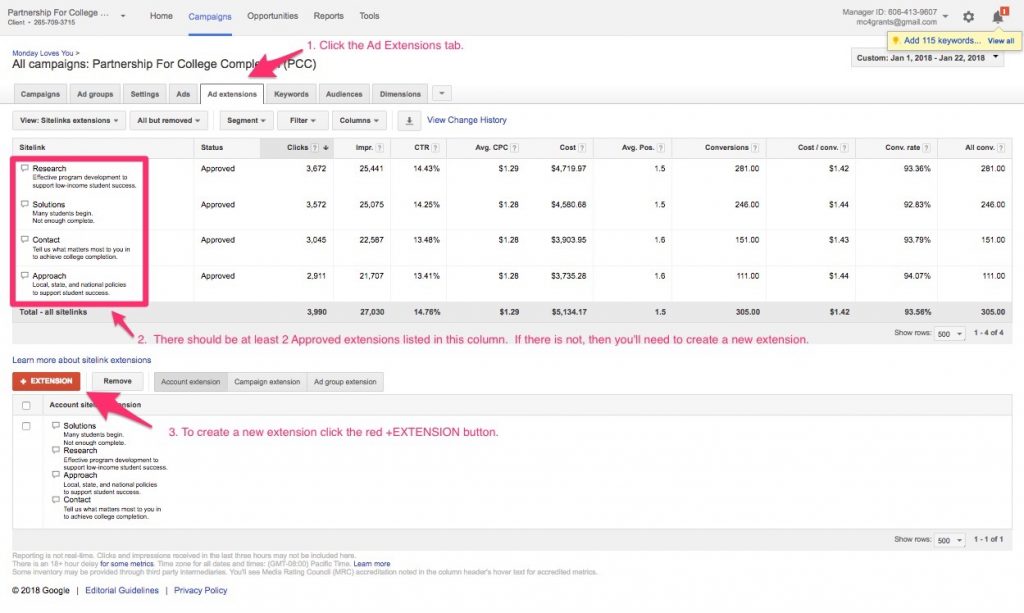
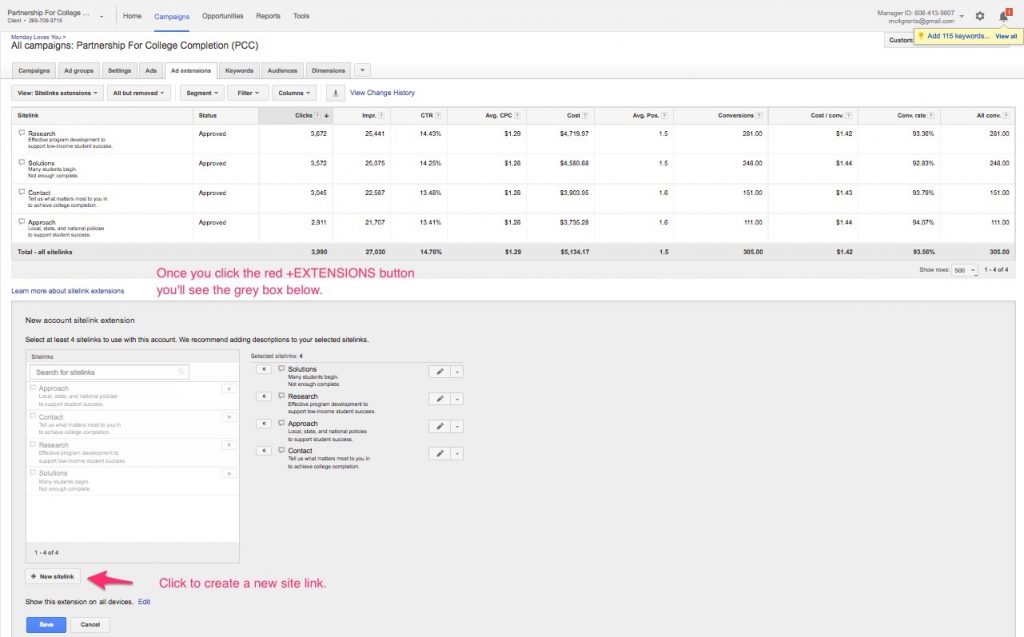
2. You’ll see a list of the ad extensions for your account in the Sitelink column as shown in this screenshot. If there are less than 2 approved links then you’ll need to create a new extension.
3. To create a new ad extension click the red +EXTENSION button. You’ll see a grey box appear.
4. Click the +New Site Link button to create a new link.
5. Once you click the +New Site Link button you’ll see a white box popup.
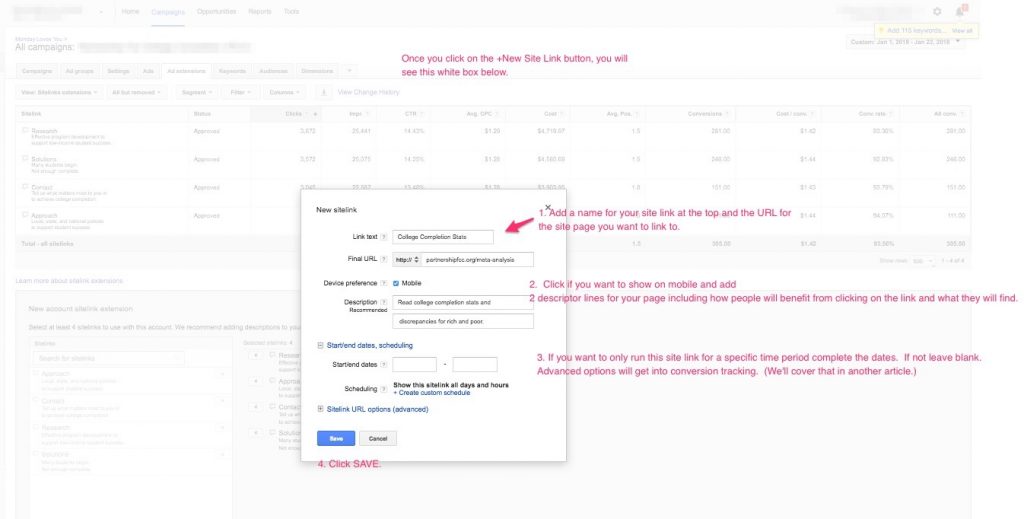
6. Complete the form with the site link title, URL to the page you want to promote and a 2 line description for what visitors will find at this link. If you want to run your site link for a specific period of time fill-in those dates. The advanced options is for conversion tracking – we’ll cover that in a different article.
7. Click SAVE.
8. You have added a new site link to your account.
You can also add site links to the Campaign and Ad Group levels, which is wise to do using this same process within the campaign and ad group screens.
V. Implement Geo-targeting.
Nonprofit account managers are now required to implement geo-targeting location criteria in their campaigns.
This policy change is designed to bring you a better pool of results. Most nonprofit’s serve defined markets in regards to geography. If your organization exclusively advocates for youth in Chicago for example, then advertising in Idaho is probably a poor use of resources.
Setting location targets
Follow the steps below to implement geo-targeting.
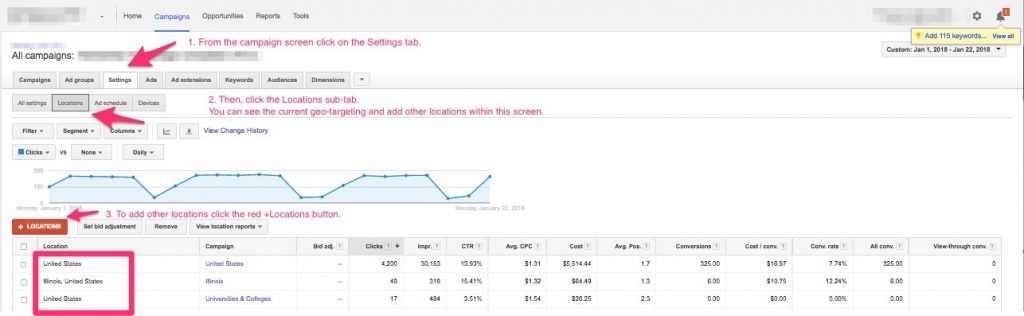
1. Click the Settings tab.
2. Next, click the Locations sub-tab below. You will now be able to see your current geo-targeting spots.
3. To add a new location, simply click the + Locations Button.
VI. Lift your $2 bid cap with Maximize Conversions.
This is an opportunity – not a requirement. Google’s updated policy allows grantees who don’t want to be restricted to the $2 bid cap, the option to change to Maximize Conversions bid strategy.
About Maximize Conversions
Historically, nonprofits have had a bidding cap of $2.00 for keywords. If your nonprofit doesn’t mind that bid cap, you don’t need to do anything.
For those nonprofits who desire the freedom to bid on words over $2 Maximize Conversions bid strategy is your solution.
Maximize Conversions automatically sets bids to help get the most conversions from your campaign, while spending your budget. It uses advanced machine learning to automatically optimize bids and offers auction-time bidding capabilities that tailor bids for each and every auction.
Setting up conversion tracking
To utilize Maximize Conversions bid strategy, you’ll first need to set-up conversion tracking tools and know what conversions or actions you want to track. You can read more about Conversion Tracking Tools here, but for this example let’s assume we are tracking engagement on a web page:
1. From the main navigation click on Tools.
2. From the drop down menu click on Conversions.
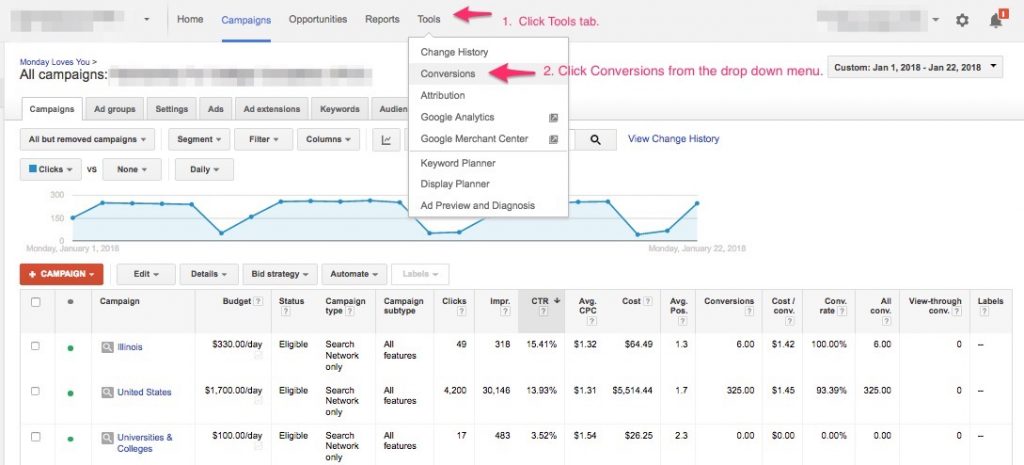
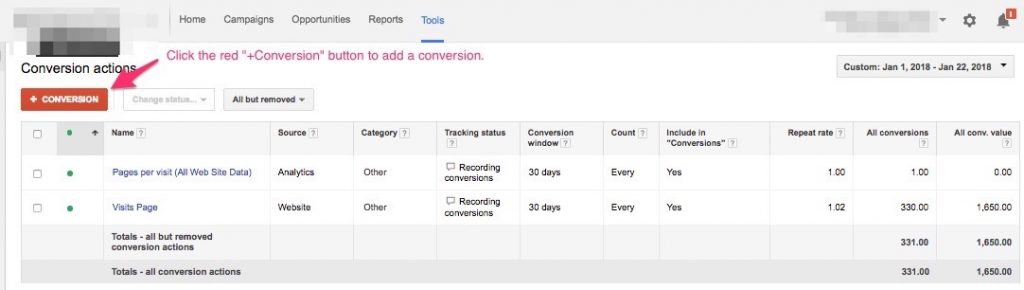
3. On the Conversions screen as shown below, click on the red +Conversions button to add a new conversion.
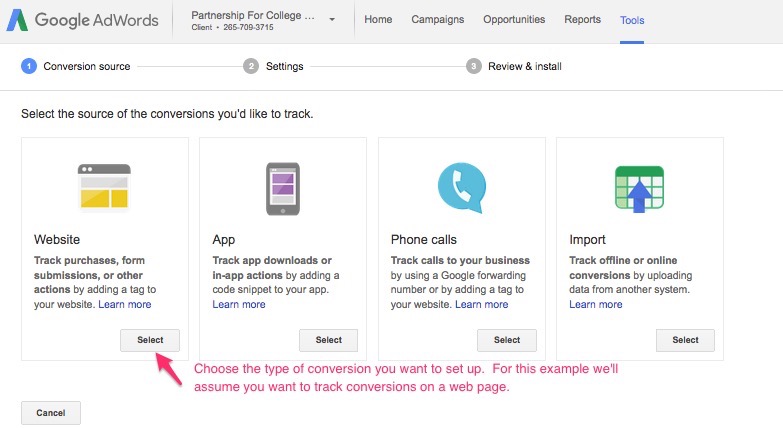
4. Choose the type of conversion you want to set-up. For this example we’ll assume you want to track conversion activity on a web page. In that case you would choose Website and click the Select button.
5. Complete the questions on the following page with answers appropriate to your conversion.
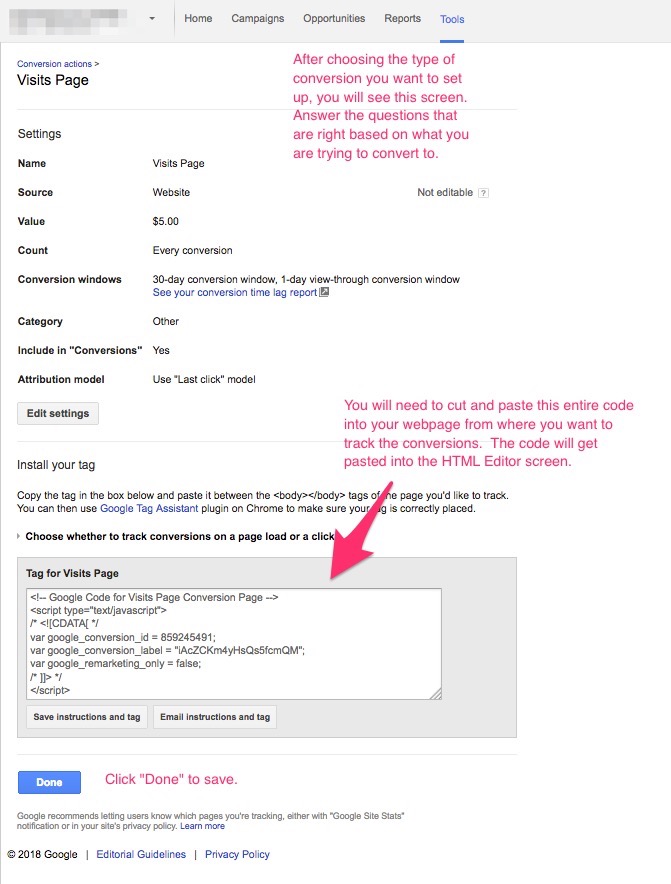
6. Once the form is completed, copy the embed code and click Done. The embed code is everything that is within the box.
7. Log into the administrative control panel for your website. Find the page you want to track for conversions and paste the code anywhere into the HTML Editor screen for that page. Then Save the page. We would advise not pasting it within a slide show, if you have one on your web page.
8. To see your conversion set-up, go to your AdWords account under Tools and choose Conversions again from the drop down menu.
Next Step: Implementing Maximize Conversions
Once you have initiated your selected conversion tracking tools, follow the steps below to enable maximize conversions. You can set the bid strategy for your campaigns.
1. From your AdWords Campaign dashboard, click the Settings tab. A drop down menu will appear.
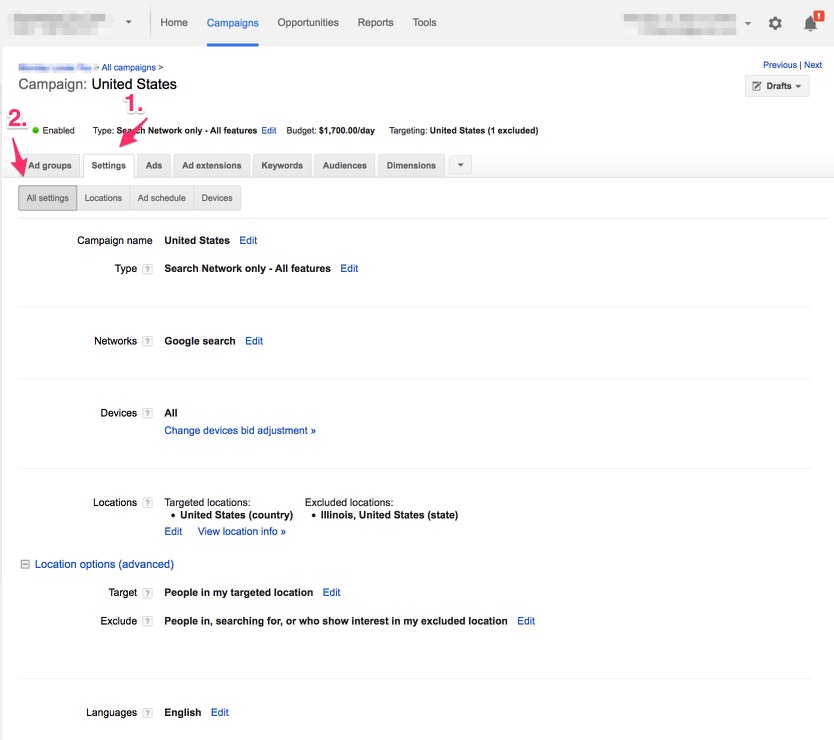
2. From the Settings tab, select the All Settings sub-tab.
3. Scroll down the All Settings page to Bid Strategy.
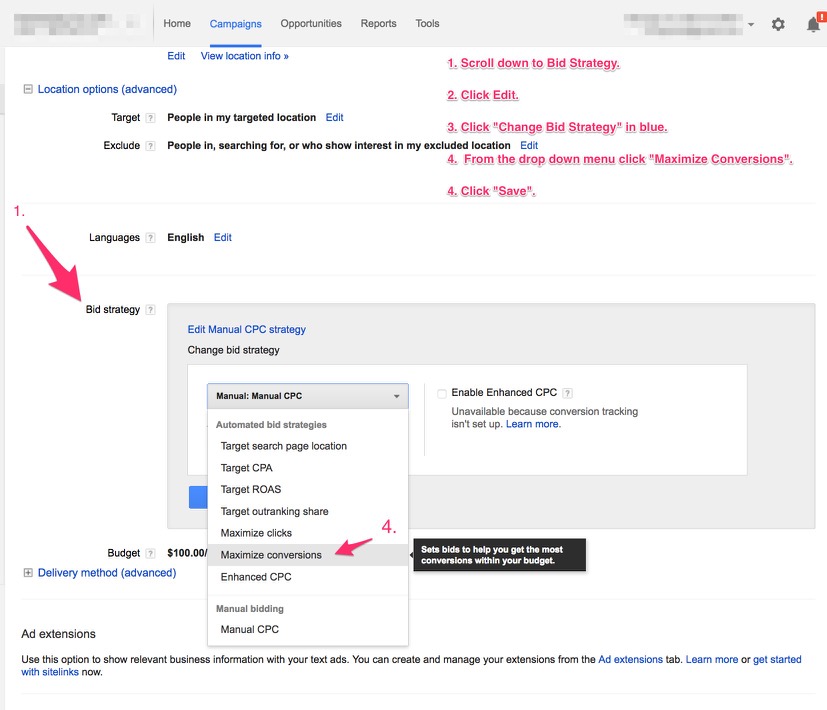
4. Mid-way down the page next to the Bid Strategy click Edit, then click the words “Change Bid Strategy” appearing in blue. A drop down menu will appear.
5. From this menu, select Maximize Conversions.
6. Click the Save button. Maximize Conversions is now enabled for your campaign.
Once you get 30 conversions within a 30 day period then the tools will begin to collect your data. It will often take about 6 weeks for the system to learn your account and optimize itself to gather real data.
To check back on your conversion data you will click the Tools tab again and Conversions from the drop down screen.
VII. Remove branded keywords you don’t own.
Google’s updated policy now requires all keywords in an AdWords account must “reflect your organization’s primary mission,” “be relevant to the goods or services offered,” and “be specific enough to provide a good experience for the user seeing your ads.”
Branded words
You cannot bid on words you do not own. So, unless you are Facebook, you can’t bid on the keyword Facebook. This may impact accounts that use competitor keywords as part of their strategy.
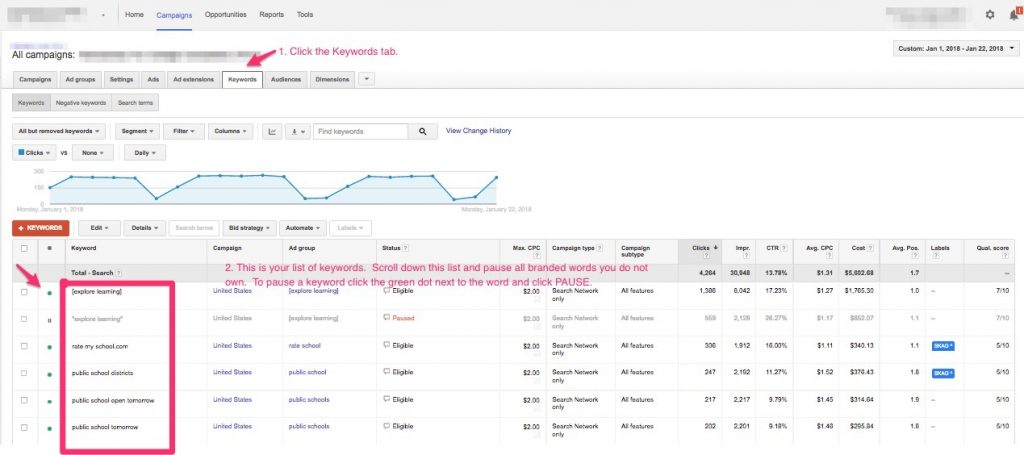
To see your list of keywords:
1. Click the Campaign tab at the top of the nav bar.
2. Then, click the Keywords tab. Your keywords are listed in the first column. Scroll through this list and pause any branded keywords you do not own.
3. To pause a keyword, click the green dot next to the word. Click PAUSE from the drop down.

VIII. No more single keywords for nonprofit accounts.
Single-words
While there is a small list of exception words with their new policy, Google is encouraging the selection of keywords which focus directly on your target audiences or descriptions of words which relate to your organization specifically.
For example, rather than using the word “store,” users will now need to clarify the type of store more specifically like “resale store” or “consignment store Palm Beach.” This is known as creating “long-tailed” keywords. While it may seem extremely tedious, there is immense value in being precise with your keywords. You may see fewer clicks, but the traffic who is clicking is likely to be better quality.
Always attempt to generate word combinations which magnify what is unique about your nonprofit’s mission and audience. This also applies to the various match types used in AdWords keywords like broad match, phrase match and exact match.
To see your list of keywords:
1. Click the Keywords tab from the Campaign screen.
2. Your keywords are in the first column.
3. Scroll through these keywords and for now pause any single word keywords until you can do some keyword research using the Keyword Planner. To pause a keyword click the green dot next to the word and click PAUSE from the drop down menu.
Keyword planner tool
A tool to help you get ideas for keywords is the Keyword Planner. The directions below explain how to access the Keyword Planner from your account.
1. From your AdWords dashboard, click the Tools tab. A drop down menu will appear.
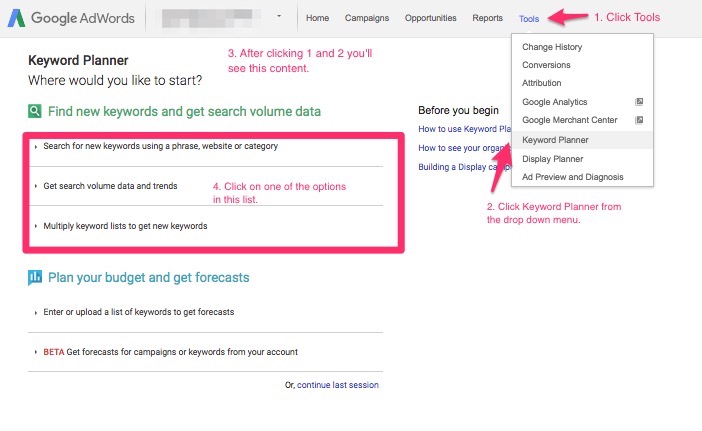
2. From the Tools tab menu, select Keyword Planner.
3. Keyword planning tool features will now be displayed on your screen. To start with the keyword planner, put in any single keywords you just paused. Add more relevant keywords to the list and the tool will help to recommend others you may want to consider. The objective is to build more of a description around your single word keywords.
We took a lot of care in making this guide because we believe empowering good organizations to do good things is the best way to make the world a better place.
In the words of George Eliot … “what do we live for, if it is not to make life less difficult for each other?“
Hopefully these instructions make life a little less difficult for you. In that spirit, we’ve also created a short video series to walk you through these updates, along with other musings on our blog.
If you are a 501c3 nonprofit organization and you are not aware of the $120,000 Google Adwords for Nonprofits grant, then let us know and we’ll walk you through how to apply.
Other Insights


Contact Us
Monday Loves You
1770 West Berteau Avenue, #206
Chicago, IL 60613
312.973.1112
hi@mondaylovesyou.com
©Duple Meter LLC 2024
Contact Us.
Monday Loves You
1770 West Berteau Avenue, #206
Chicago, IL 60613
312.973.1112
hi@mondaylovesyou.com